Spring核心基础
Spring Bean命名策略
概述
当我们有多个相同类型的实现时,命名Spring bean非常有用。这是因为如果我们的 bean 没有唯一的名称,Spring 将不明确注入 bean。
通过控制 bean 的命名,我们可以告诉 Spring 我们要将哪个 bean 注入目标对象。
在本文中,我们将讨论 Spring bean 命名策略,并探讨如何为单一类型的 bean 赋予多个名称。
默认 Bean 命名策略
Spring为创建 bean提供了多个注解。我们可以在不同级别使用这些注解。例如,我们可以在 bean 类上放置一些注解,而在创建 bean 的方法上放置其他注解。
首先,让我们看看 Spring 的默认命名策略。当我们只指定注解而没有任何值时,Spring 如何命名我们的 bean?
类级注解
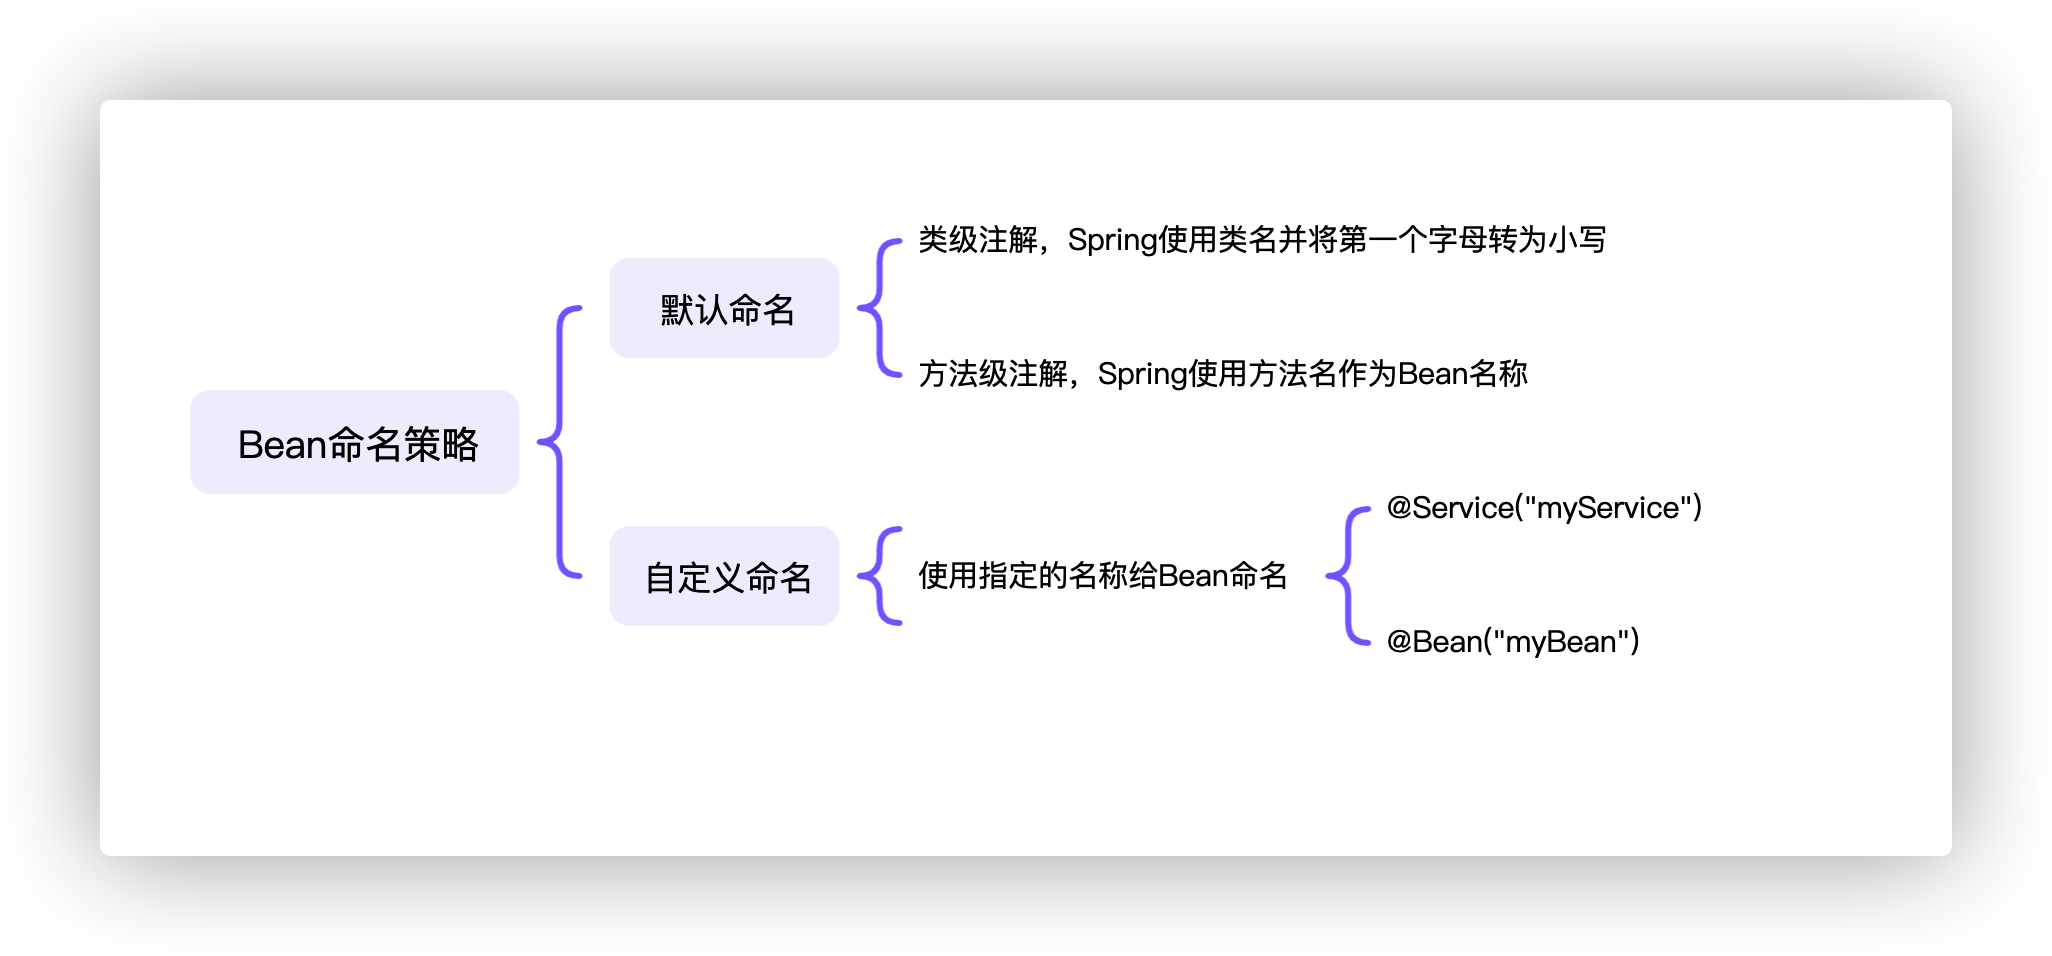
让我们从在类级别使用的注解的默认命名策略开始。为了给 bean 命名,Spring 使用类名并将第一个字母转换为小写。
我们来看一个例子:
1 |
|
在这里,Spring 为LoggingService类创建了一个 bean,并使用名称loggingService注册它。
这个相同的默认命名策略适用于用于创建 Spring bean 的所有类级注解,例如@Component、@Service和@Controller。
方法级注解
Spring 提供了诸如@Bean和@Qualifier之类的注解,用于在方法上创建 bean 。
让我们看一个例子来理解@Bean注解的默认命名策略:
1 |
|
在这个配置类中,Spring在名称“ audit ”下注册了一个AuditService类型的 bean,因为当我们在方法上使用@Bean注解时,Spring 使用方法名称作为 bean 名称。
我们也可以在方法上使用@Qualifier注解。
Bean 的自定义命名
当我们需要在同一个 Spring 上下文中创建多个相同类型的 bean 时,我们可以为 bean 指定自定义名称并使用这些名称引用它们。
那么,让我们看看如何为我们的 Spring bean 指定一个自定义名称:
类级注解
1 |
|
这一次,Spring 将创建名为“ myBean ”的MyCustomComponent类型的 bean 。
由于我们明确地为 bean 指定名称,Spring 将使用此名称,然后可以使用该名称来引用或访问 bean。
与@Component(“myBean”)类似,我们可以使用@Service(“myService”)、@Controller(“myController”)和@Bean(“myCustomBean”)等其他注解指定名称,然后Spring 会注册具有给定名称的那个 bean。
方法级注解
正如我们之前看到的,@Bean注解是在方法级别应用的,默认情况下,Spring 使用方法名称作为 bean 名称。
这个默认的 bean 名称可以被覆盖——我们可以使用@Bean注解指定值:
1 | @Configuration |
在这种情况下,当我们想要获取一个MyCustomComponent类型的 bean 时,我们可以使用名称“ beanComponent ”来引用这个 bean 。
Spring @Bean注解通常在配置类方法中声明。它可以通过直接调用来引用同一个类中的其他@Bean方法。
总结

Spring ApplicationContext
ApplicationContext接口
Spring 框架的主要特性之一是IoC(控制反转)容器。在Spring IoC容器负责管理应用程序的对象。它使用依赖注入来实现控制反转。
BeanFactory和ApplicationContext 接口代表 Spring IoC 容器。在这里,BeanFactory是访问 Spring 容器的根接口。它提供了管理 bean 的基本功能。
另一方面,ApplicationContext 是BeanFactory的子接口。因此,它提供了BeanFactory的所有功能。
此外,它还提供了 更多特定于企业的功能。ApplicationContext的重要特性是解析消息、支持国际化、发布事件和应用层特定上下文。这就是我们将其用作默认 Spring 容器的原因。
在容器中配置Bean
正如我们所知,ApplicationContext的主要工作是管理 bean。
因此,应用程序必须向ApplicationContext容器提供 bean 配置。一个 Spring bean 配置由一个或多个 bean 定义组成。此外,Spring 支持不同的 bean 配置方式。
基于 Java 的配置
首先,我们将从基于 Java 的配置开始,因为它是最新和最受欢迎的 bean 配置方式。它从 Spring 3.0 开始可用。
Java 配置通常在@Configuration类中使用带有 @Bean 注解的方法。方法上的@Bean注解表明该方法创建了一个 Spring bean。此外,用@Configuration注解的类表示它包含Spring bean 配置。
现在让我们创建一个配置类来将我们的AccountService类定义为 Spring bean:
1 |
|
基于注解的配置
Spring 2.5 引入了基于注解的配置,作为在 Java 中启用 bean 配置的第一步。
在这种方法中,我们首先通过XML配置启用基于注解的配置。然后我们在 Java 类、方法、构造函数或字段上使用一组注解来配置 bean。这些注解的一些示例是@Component、@Controller、@Service、@Repository、@Autowired和@Qualifier。
值得注意的是,我们也将这些注解用于基于 Java 的配置。另外值得一提的是,Spring 会在每个版本中不断为这些注解添加更多功能。
现在让我们看一个这个配置的简单例子。
首先,我们将创建 XML 配置user-bean-config.xml以启用注解:
1 |
|
在这里,该注解的配置标签启用基于注解的映射。该组件扫描标签也告诉Spring到哪里寻找注解类。
其次,我们将创建UserService类并使用@Component注解将其定义为 Spring bean :
1 |
|
基于 XML 的配置
最后,让我们看一下基于 XML 的配置。这是在 Spring 中配置 bean 的传统方式。
显然,在这种方法中,我们在一个 XML 配置文件中完成所有bean 映射。
因此,让我们创建一个 XML 配置文件account-bean-config.xml,并为我们的AccountService类定义 bean :
1 |
|
ApplicationContext 的类型
Spring 提供了适合不同需求的不同类型的ApplicationContext容器。这些是ApplicationContext接口的实现。那么让我们来看看ApplicationContext 的一些常见类型。
AnnotationConfigApplicationContext
首先我们来看一下Spring 3.0中引入的AnnotationConfigApplicationContext类。它可以采取与注解的类@Configuration,@Component,和JSR-330的元数据作为输入。从Java的配置类中加载上下文定义。
因此,让我们看一个使用AnnotationConfigApplicationContext容器和基于 Java 的配置的简单示例:
1 | ApplicationContext context = new AnnotationConfigApplicationContext(AccountConfig.class); |
AnnotationConfigWebApplicationContext
适用于 Web 应用下xml文件中加载上下文,使用注解方式加载上下文
当我们 在web.xml文件中配置 Spring 的ContextLoaderListener servlet侦听器或Spring MVC DispatcherServlet时,我们可能会使用这个类。
此外,从 Spring 3.0 开始,我们还可以通过编程方式配置这个应用程序上下文容器。我们需要做的就是实现WebApplicationInitializer接口:
1 | public class MyWebApplicationInitializer implements WebApplicationInitializer { |
XmlWebApplicationContext
如果我们在 Web 应用程序中使用基于 XML 的配置,我们可以使用XmlWebApplicationContext类。
事实上,配置这个容器就像AnnotationConfigWebApplicationContext类,也就是说我们可以在web.xml中配置它, 或者实现WebApplicationInitializer接口:
1 | public class MyXmlWebApplicationInitializer implements WebApplicationInitializer { |
FileSystemXMLApplicationContext
我们使用FileSystemXMLApplicationContext类从文件系统或 URL加载基于 XML 的 Spring 配置文件。当我们需要以编程方式加载ApplicationContext时,这个类很有用。一般来说,测试工具和独立应用程序是一些可能的用例。
例如,让我们看看如何创建这个 Spring 容器并为基于 XML 的配置加载 bean:
1 | String path = "C:/myProject/src/main/resources/applicationcontext/account-bean-config.xml"; |
ClassPathXmlApplicationContext
如果我们想从 classpath 加载 XML 配置文件,我们可以使用ClassPathXmlApplicationContext类。与FileSystemXMLApplicationContext类似,它对于测试工具以及嵌入在 JAR 中的应用程序上下文很有用。
那么让我们看一个使用这个类的例子:
1 | ApplicationContext context = new ClassPathXmlApplicationContext("applicationcontext/account-bean-config.xml"); |
BeanFactory 和 ApplicationContext 的区别
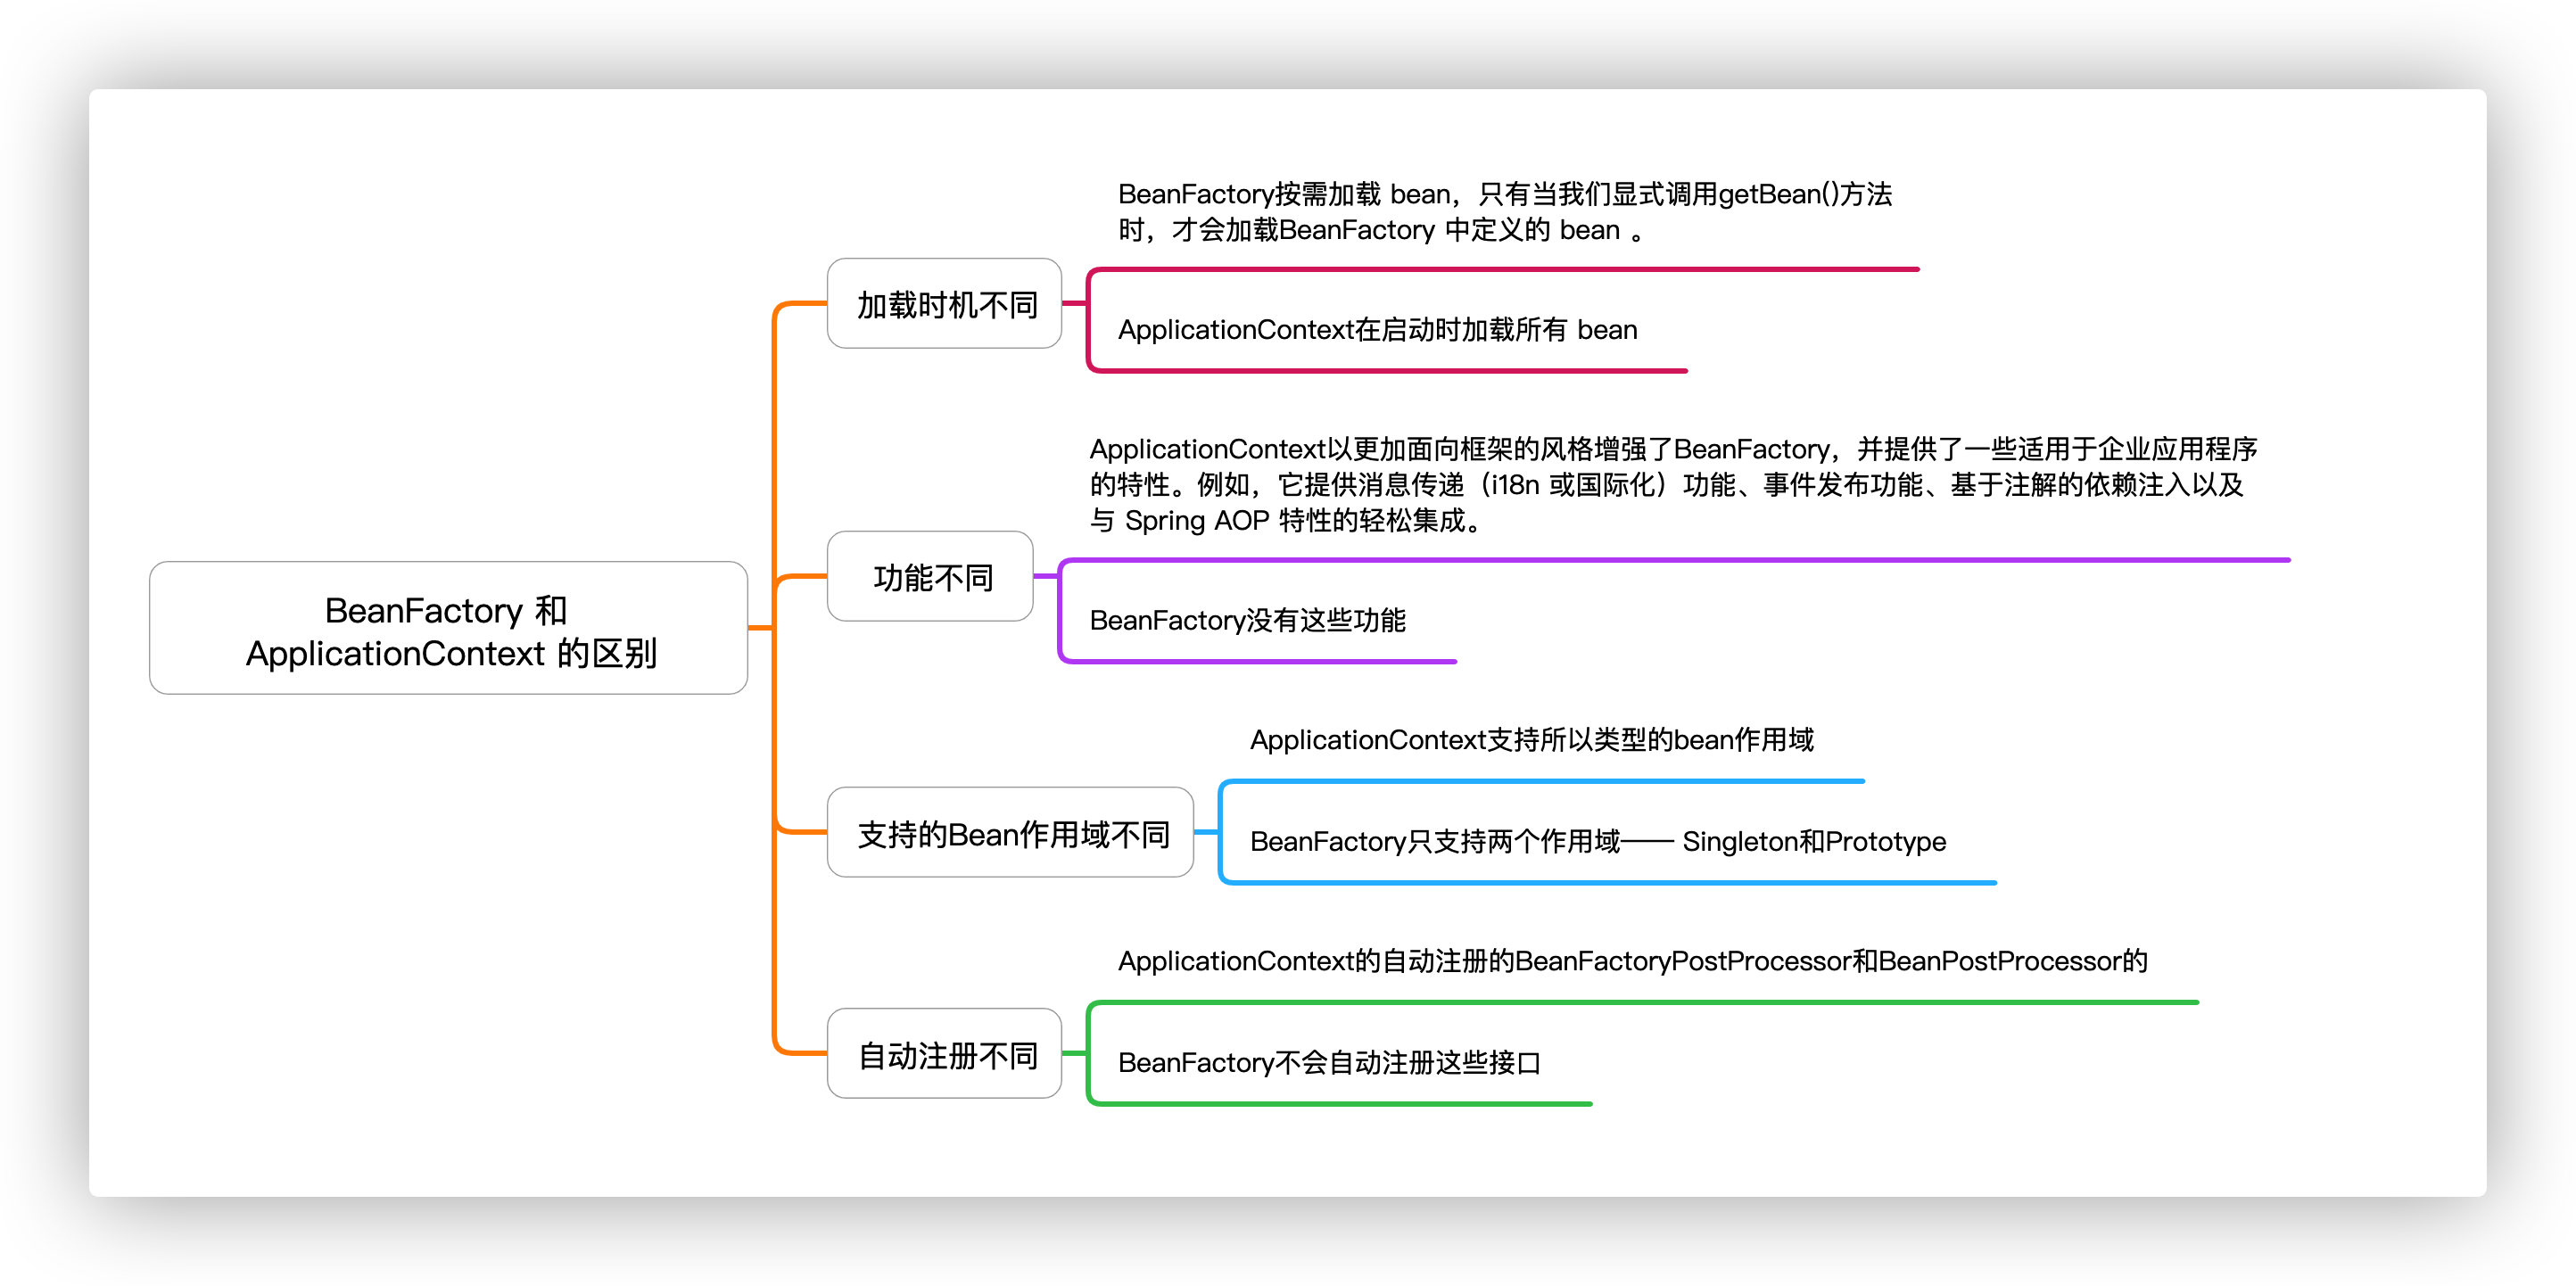
Spring 框架带有两个 IOC 容器—— BeanFactory和ApplicationContext。该Bean工厂是IOC容器的最基本的版本,以及ApplicationContext的扩展的功能Bean工厂。
我们将通过实际示例了解这两个 IOC 容器之间的显着差异。

该ApplicationContext的带有先进的功能,包括正朝着企业应用面向好几个,而Bean工厂仅预装了基本功能。因此,通常建议使用ApplicationContext的,并且只有当内存消耗是至关重要的时候,我们才应该使用Bean工厂。
@ComponentScan
在这篇文章中,我们将看到@ComponentScan注解可用的不同类型的过滤器选项 。
@ ComponentScan过滤器
默认情况下,使用@Component、@Repository、@Service、@Controller注解的类被注册为Spring beans。对于使用@Component注解的自定义注解的类也是如此。我们可以通过使用@ComponentScan注解的includeFilters和 excludeFilters参数 来扩展此行为。
ComponentScan.Filter有五种类型的过滤器:
ANNOTATION按照注解过滤ASSIGNABLE_TYPE按照给定的类型ASPECTJ使用ASPECTJ表达式REGEX正则表达式CUSTOM自定义规则
FilterType.ANNOTATION
例如,假设我们有一个@Animal注解:
1 |
|
现在,让我们定义一个 使用*@Animal的Elephant*类:
1 |
|
最后,让我们使用FilterType.ANNOTATION告诉 Spring 扫描 @Animal 注解的类:扫描仪很好地拾取了我们的Elephant
1 |
|
FilterType.ASSIGNABLE_TYPE
首先,让我们声明Animal 接口:
1 | public interface Animal { } |
再一次,让我们声明我们的Elephant类,这次实现Animal接口:
1 | public class Elephant implements Animal { } |
让我们声明我们的Cat类也实现了Animal:
1 | public class Cat implements Animal { } |
现在,让我们使用ASSIGNABLE_TYPE来引导 Spring 扫描Animal实现类:
1 |
|
Cat和Elephant 都被扫描到。
FilterType.REGEX
再一次,让我们声明我们的Elephant类。这次没有实现任何接口或使用任何注解进行注解:
1 | public class Elephant { } |
让我们再声明一个类Cat:
1 | public class Cat { } |
现在,让我们声明Loin类:
1 | public class Loin { } |
让我们使用FilterType。REGEX指示 Spring 扫描与正则表达式.*[nt]匹配的类。我们的正则表达式计算所有包含nt 的内容:
1 |
|
这次在我们的测试中,我们将看到 Spring 扫描Elephant,而不是Lion :
FilterType.ASPECTJ
对于这个用例,我们可以重用与上一节相同的三个类。
让我们使用FilterType.ASPECTJ来指示 Spring 扫描与我们的AspectJ表达式匹配的类:
1 |
|
虽然有点复杂,但我们这里的逻辑希望 bean 的类名中既不以“L”也不以“C”开头,因此我们又得到了Elephant s
@Qualifier
Autowire 消除歧义的需要
当需要自动注入特定精确的Bean时,@Autowire是一种很好的方式,尽管它很有用,但在某些用例中,仅此注解不足以让 Spring 了解要注入哪个 bean。
默认情况下,Spring 按类型解析自动装配的条目。
如果容器中有多个相同类型的 bean,则框架将抛出NoUniqueBeanDefinitionException, 表明有多个 bean 可用于自动装配。
让我们想象这样一种情况,其中 Spring 存在两个可能的候选者作为 bean 协作者注入给定实例:
1 |
|
如果我们尝试将FooService加载到我们的上下文中,Spring 框架将抛出一个NoUniqueBeanDefinitionException。这是因为Spring 不知道要注入哪个 bean。为了避免这个问题,有几种解决方案;该@Qualifier注解就是其中之一。
@ Qualifier注解
通过使用@Qualifier注解,我们可以消除需要注入哪个bean的问题。
让我们回顾一下之前的示例,看看我们如何通过包含*@Qualifier*注解来指示我们要使用哪个 bean 来解决问题:
1 | public class FooService { |
通过包含*@Qualifier注解,连同我们想要使用的具体实现的名称,在这个例子中为Foo,*我们可以避免当 Spring 找到多个相同类型的 bean 时产生歧义。
我们需要考虑到要使用的限定符名称是@Component注解中声明的名称。
请注意,我们也可以在Formatter实现类上使用@Qualifier注解,而不是在它们的@Component注解中指定名称,以获得相同的效果:
1 |
|
@Qualifier VS @Primary
还有另一个名为@Primary的注解 ,当依赖注入存在歧义时,我们可以使用它来决定注入哪个 bean。
当存在多个相同类型的 bean 时,此注解定义了一个首选项。除非另有说明,否则将使用与@Primary注解关联的 bean 。
让我们看一个例子:
1 |
|
在此示例中,两种方法都返回相同的Employee类型。Spring 将注入的 bean 是tonyEmployee方法返回的bean。这是因为它包含@Primary注解。当我们想要指定默认情况下应该注入哪个特定类型的 bean时,此注解很有用。
如果我们在某个注入时需要另一个 bean,我们需要特别指出它。我们可以通过*@Qualifier注解来做到这一点。例如,我们可以通过使用@Qualifier注解来指定我们要使用johnEmployee*方法返回的 bean 。
值得注意的是,如果@Qualifier和@Primary注解都存在,那么@Qualifier注解将具有优先权。基本上,@Primary定义了一个默认值,而@Qualifier则非常具体。
理解 Spring 中的 getBean()
我们将介绍BeanFactory.getBean()方法的不同变体。
简而言之,正如该方法的名称所暗示的那样,它负责从 Spring 容器中检索 bean 实例。
Spring Beans 设置
首先,让我们定义几个 Spring bean 进行测试。我们可以通过多种方式为 Spring 容器提供 bean 定义,但在我们的示例中,我们将使用基于注解的 Java 配置:
1 |
|
我们已经创建了两个 bean。Lion具有默认的单例范围。Tiger明确设置为原型范围。此外,请注意,我们为将在进一步请求中使用的每个 bean 定义了名称。
getBean() API
BeanFactory提供了getBean()方法的五种不同签名
按名称检索 Bean
让我们看看如何使用名称检索Lion bean 实例:
1 | Object lion = context.getBean("lion"); |
在这个变体中,我们提供一个名称,作为回报,如果应用程序上下文中存在具有给定名称的 bean ,我们将获得一个Object 类的实例。否则,如果 bean 查找失败,则此实现和所有其他实现都将抛出NoSuchBeanDefinitionException。
主要的缺点是在检索 bean 后,我们必须将其强制转换为所需的类型如果返回的 bean 的类型与我们预期的不同,这可能会产生另一个异常。
按名称和类型检索 Bean
这里我们需要指定请求的 bean 的名称和类型:
1 | Lion lion = context.getBean("lion", Lion.class); |
与前一种方法相比,这种方法更安全,因为我们可以立即获取有关类型不匹配的信息。
按类型检索 Bean
使用getBean()的第三个变体, 仅指定 bean 类型就足够了:
1 | Lion lion = context.getBean(Lion.class); |
在这种情况下,我们需要特别注意一个潜在的模棱两可的结果
在上面的示例中,由于Lion和Tiger 都实现了Animal接口,因此仅指定类型不足以明确确定结果。因此,我们得到一个NoUniqueBeanDefinitionException。
使用构造函数参数按名称检索 Bean
除了 bean 名称,我们还可以传递构造函数参数:
1 | Tiger tiger = (Tiger) context.getBean("tiger", "Siberian"); |
这个方法有点不同,因为它只适用于具有原型作用域的 bean。
在单例的情况下,我们将得到一个BeanDefinitionStoreException
因为原型 bean 每次从应用程序容器请求时都会返回一个新创建的实例,所以我们可以在调用getBean()时 即时提供构造函数参数:
1 | Tiger tiger = (Tiger) context.getBean("tiger", "Siberian"); |
正如我们所见,根据我们在请求 bean 时指定为第二个参数的内容,每个Tiger获得不同的名称。
使用构造函数参数按类型检索 Bean
这个方法类似于最后一个,但我们需要传递类型而不是名称作为第一个参数:
1 | Tiger tiger = context.getBean(Tiger.class, "Shere Khan"); |
与使用构造函数参数按名称检索 bean 类似,此方法仅适用于具有原型范围的 bean。
使用注意事项
@RequestParam
简单地说,我们可以使用@RequestParam从请求中提取查询参数、表单参数甚至文件。
一个简单的映射
假设我们有一个端点/api/foos,它接受一个名为id的查询参数 :
1 |
|
在这个例子中,我们使用@RequestParam来提取id查询参数。
一个简单的 GET 请求将调用getFoos:
1 | http://localhost:8080/api/foos?id=abc |
接下来,让我们看看注解的属性:name、 value、required和defaultValue。
指定请求参数名称
幸运的是,我们可以使用name属性配置@RequestParam名称:
1 |
|
我们也可以做 @RequestParam(value = “id”)或者只是@RequestParam(“id”)。
可选的请求参数
默认用@RequestParam注解的方法参数 是必须的。
这意味着如果请求中不存在该参数,我们将收到错误消息:
1 | GET /api/foos HTTP/1.1 |
使用required 属性将@RequestParam配置为可选:
1 |
|
在这种情况下,两者:
1 | http://localhost:8080/api/foos?id=abc |
和
1 | http://localhost:8080/api/foos |
将正确调用该方法。
当未指定参数时,方法参数绑定到null。
请求参数的默认值
我们还可以 使用defaultValue属性为@RequestParam设置默认值:
1 |
|
这就像required=false, 因为用户不再需要提供参数:
1 | http://localhost:8080/api/foos |
尽管如此,我们仍然可以提供它:
1 | http://localhost:8080/api/foos?id=abc |
请注意,当我们设置 defaultValue 属性时, required确实设置为false。
映射所有参数
我们也可以有多个参数,而无需定义它们的名称或计数,只需使用Map:
1 |
|
然后将反映发送的任何参数:
1 | curl -X POST -F 'name=abc' -F 'id=123' http://localhost:8080/api/foos |
映射多值参数
单个@RequestParam可以有多个值:
1 |
|
Spring MVC 将映射一个逗号分隔的 id 参数:
1 | http://localhost:8080/api/foos?id=1,2,3 |
或单独的id参数列表:
1 | http://localhost:8080/api/foos?id=1&id=2 |
@Component vs @Repository 和 @Service 在 Spring 中区别
在大多数典型的应用程序中,我们有不同的层,如数据访问、表示、服务、业务等。
此外,在每一层中,我们都有不同的 bean。为了自动检测这些 bean,Spring 使用类路径扫描注释。
然后它在ApplicationContext 中注册每个 bean 。
以下是其中一些注释的快速概览:
@Component是任何 Spring 管理的组件的通用构造型。@Service在服务层注释类。@Repository在持久层注释类,它将充当数据库存储库。
有什么不同?
这些刻板印象之间的主要区别在于它们用于不同的分类。当我们为自动检测注释一个类时,我们应该使用相应的构造型。
现在让我们更详细地了解它们。
@Component
我们可以在整个应用程序中使用 @Component 将 bean 标记为 Spring 的托管组件。@Component是任何 Spring 管理的组件的通用构造型。Spring 只会使用@Component获取和注册 bean ,一般不会查找@Service 和 @Repository。
它们在ApplicationContext中注册,因为它们用@Component作为元注解:
1 |
|
@Service 和 @Repository是@Component的特例,相当于给@Component 起的别名。它们在技术上是相同的,但我们将它们用于不同的目的。
@Repository
@Repository的工作是捕获特定于持久性的异常并将它们作为 Spring 的统一未检查异常之一重新抛出。
为此,Spring 提供了PersistenceExceptionTranslationPostProcessor,我们需要将其添加到我们的应用程序上下文中(如果我们使用 Spring Boot,则已包含):
1 | <bean class= |
这个 bean 后处理器向任何用*@Repository*注释的 bean 添加了一个顾问 。
@Service
我们用 @Service 标记 bean 以表明它们持有业务逻辑。除了在服务层使用之外,这个注解没有任何其他特殊用途。
Spring 中基于 XML 的注入
让我们从在pom.xml 中添加 Spring 的库依赖开始:
1 | <dependency> |
依赖注入——概述
依赖注入是一种技术,其中对象的依赖项由外部容器提供。
假设我们有一个依赖于实际处理业务逻辑的服务的应用程序类:
1 | public class IndexApp { |
现在让我们说IService是一个接口:
1 | public interface IService { |
这个接口可以有多个实现。
让我们快速看一下一个潜在的实现:
1 | public class IndexService implements IService { |
这里,IndexApp是一个依赖于名为IService的低级组件的高级组件。
从本质上讲,我们将IndexApp与IService的特定实现分离,该实现可能因各种因素而异。
依赖注入
使用属性注入
让我们看看如何使用基于 XML 的配置将依赖项连接在一起:
1 | <bean |
可以看出,我们正在创建一个IndexService实例并为其分配一个 id。默认情况下,bean 是单例。此外,我们正在创建IndexApp的实例。
在这个 bean 中,我们使用 setter 方法注入另一个 bean。
使用构造函数注入
我们可以使用构造函数注入依赖项,而不是通过 setter 方法注入 bean:
1 | <bean |
使用静态工厂
我们也可以注入一个由工厂返回的 bean。让我们创建一个简单的工厂,根据提供的数字返回IService的实例:
1 | public class StaticServiceFactory { |
现在让我们看看我们如何使用上述实现使用基于 XML 的配置将 bean 注入到IndexApp 中:
1 | <bean id="messageService" |
在上面的例子中,我们使用factory-method调用静态getService方法来创建一个带有 id messageService的 bean ,我们将其注入IndexApp。
使用工厂方法
让我们考虑一个实例工厂,它根据提供的数字返回一个IService实例。这一次,该方法不是静态的:
1 | public class InstanceServiceFactory { |
现在让我们看看我们如何使用上面的实现来使用 XML 配置将 bean 注入到IndexApp 中:
1 | <bean id="indexServiceFactory" |
在上面的示例中,我们使用factory-method调用InstanceServiceFactory 实例上的getService方法来创建一个带有 id messageService的 bean ,我们将其注入IndexApp。
访问配置的bean:
这是我们如何访问配置的bean:
1 |
|
使用带有默认值的 Spring @Value
字符串默认值
让我们看一下为String属性设置默认值的基本语法:
1 |
|
如果some.key无法解析,stringWithDefaultValue将设置为my default value的默认值。
同样,我们可以设置一个零长度的字符串作为默认值:
1 | " |
基本类型默认值
要为基本类型(例如boolean和int )设置默认值,我们使用文字值:
1 |
|
如果我们愿意,我们可以通过将类型更改为Boolean和Integer来使用原始包装器。
数组
我们还可以将逗号分隔的值列表注入数组:
1 |
|
在上面的第一个示例中,值one、two 和three作为默认值注入到stringArrayWithDefaults 中。
使用 SpEL 的高级示例
我们还可以使用 SpEL 表达式来获取值。
如果我们有一个名为priority的系统属性,那么它的值将应用于该字段:
1 |
|
如果我们还没有定义系统属性,那么将分配空值。
为了防止这种情况,我们可以在 SpEL 表达式中提供一个默认值。如果未定义系统属性,我们会为该字段获取一些默认值:
1 |
|
此外,我们可以使用来自其他 bean 的字段值。假设我们有一个名为someBean的 bean ,其字段someValue等于10。然后,将10分配给该字段:
1 |
|
我们可以操作属性来获取值列表,这里是字符串值 A、B 和 C 的列表:
1 |
|
@Value(“${}”)和@Value(“#{}”)的区别
@Value("${}")主要获取的是配置文件application.yml /application.proterties中的配置信息。@Value("#{}")表示SpEl表达式通常用来获取bean的属性,或者调用bean的某个方法或属性。当然还有可以表示常量
在下面的示例中,我们希望将some.system.key设置为系统属性,如果未设置,我们希望使用我的默认系统属性值 作为默认值:
1 |
|
@Autowired vs @Resource vs @Inject 的区别
为了实现依赖注入 DI 而引入,Java 提供javax.annotation.Resource , javax.inject.Inject 注解,Spring 框架提供了 org.springframework.beans.factory.annotation.Autowired。依赖注入(Denpendency Injection,DI), 控制反转(Inversion of Control, IoC),主要的目的是去除代码耦合。
具体解释
| Annotation | Package | Source |
|---|---|---|
| @Autowired | org.springframework.beans.factory.annotation.Autowire | Spring |
| @Resource | javax.annotation.Resource | Java |
| @Inject | javax.inject.Inject | Java 需额外依赖 |
@Autowired: Spring 特有的注解,@Autowired 通过类型来注入,比如通过类的类型,或者类的接口来注解 field 或者 constructor。为了防止在项目中实现同一个接口,或者一系列子类,可以使用 @Qualifier 注解来避免歧义。默认情况下 bean 的名字就是 qualifier 的值。 尽管你可以按照约定通过名字来使用 @Autowired 注解,@Autowired 根本上还是类型驱动的注入,并且附带可选的语义上的 qualifiers.
@Inject: 该注解基于 JSR-330, @Inject 注解是 Spring @Autowired 注解的代替品。所以使用 Spring 独有的 @Autowired 注解时,可以考虑选择使用 @Inject. @Autowired 和 @Inject 的不同之处在于是否有required属性,@Inject 没有 required 属性,因此在找不到合适的依赖对象时 inject 会失败,而 @Autowired 可以使用 required=false 来允许 null 注入。
使用 @Inject 需要添加如下依赖:
1 | <dependency> |
Advantage of @Inject annotation is that rather than inject a reference directly, you could ask @Inject to inject a Provider. The Provider interface enables, among other things, lazy injection of bean references and injection of multiple instances of a bean. In case we have few implementation of an interface or a subclass we can narrow down the selection using the @Named annotation to avoid ambiguity. @Named annotation works much like Spring’s @Qualifier
@Resource: JDK 1.6 支持注解,JSR-250 引入。@Resource 和 @Autowired @Inject 类似,最主要的区别在于寻找存在的 Bean 注入的路径不同。@Resource寻找的优先顺序为
- 1)优先通过名字 (by name)
- 2)其次是类型 (by type)
- 3)再次是 qualifier(by qualifier)
而 @Autowired and @Inject 寻找的顺序为
- 通过类型寻找
- 通过 qualifier
- 最后通过名字寻找
@Resource 如果没有指定 name 属性,当注解标注在 field 上,默认取字段名称作为 bean 名称寻找依赖对象;当标注在属性 setter 方法上,默认取属性名作为 bean 名称寻找依赖。如果没有指定 name 属性,并且按照默认名称找不到依赖对象时,回退到类型装配。
@Autowired
从 Spring 2.5 开始,该框架引入了注解驱动的依赖注入。此功能的主要注释是@Autowired 。 它允许 Spring 解析并将协作 bean 注入到我们的 bean 中。
启用@Autowired注解
Spring 框架支持自动依赖注入。换句话说,通过在 Spring 配置文件中声明所有 bean 依赖项,Spring 容器可以自动装配协作 bean 之间的关系。这称为Spring bean 自动装配。
要在我们的应用程序中使用基于 Java 的配置,让我们启用注解驱动注入 来加载我们的 Spring 配置:
1 |
|
或者,注解主要用于激活 Spring XML 文件中的依赖注入注解。
此外,Spring Boot 引入了@SpringBootApplication注解。这个单一的注解等效于使用@Configuration、@EnableAutoConfiguration和 @ComponentScan。
让我们在应用程序的主类中使用这个注解:
1 |
|
因此,当我们运行这个 Spring Boot 应用程序时,它会自动扫描当前包及其子包中的组件。因此,它将在 Spring 的应用程序上下文中注册它们,并允许我们使用@Autowired注入 bean 。
使用@Autowired
启用注解注入后,我们可以在属性、设置器和构造函数上使用自动装配。
@Autowired用在属性上
让我们看看如何使用@Autowired注释属性。这消除了对 getter 和 setter 的需要。
首先,让我们定义一个fooFormatter bean:
1 |
|
然后,我们将在字段定义上使用*@Autowired将此 bean 注入FooService* bean :
1 |
|
其结果是,Spring注入fooFormatter时FooService接口被创建。
@Autowired在 Setter 上
现在让我们尝试在 setter 方法上添加 @Autowired 注释。
在以下示例中,在创建FooService时使用FooFormatter实例调用 setter 方法:
1 | public class FooService { |
@Autowired在构造函数上
最后,让我们在构造函数上使用 @Autowired 。
我们将看到Spring 注入了一个FooFormatter实例作为FooService构造函数的参数:
1 | public class FooService { |
@Autowired 可选注入
在构建 bean 时,@ Autowired依赖项应该可用。否则,如果 Spring 无法解析用于连接的 bean,它将抛出异常。
因此,它会阻止 Spring 容器成功启动,但以下形式除外:
1 | Caused by: org.springframework.beans.factory.NoSuchBeanDefinitionException: |
为了解决这个问题,我们需要required解决
1 | public class FooService { |
@PropertySource注解
@PropertySource注解是Spring 3.1开始引入的配置类注解。通过@PropertySource注解将properties配置文件中的值存储到Spring的Environment中,Environment接口提供方法去读取配置文件中的值,参数是properties文件中定义的key值。也可以使用@Value注解用${}占位符注入属性
@PropertySource注解的源代码如下所示。
1 | package org.springframework.context.annotation; |
从@PropertySource的源码可以看出,我们可以通过@PropertySource注解指定多个properties文件,可以使用如下形式进行指定。
1 |
细心的读者可以看到,在@PropertySource注解类的上面标注了如下的注解信息。
1 |
看到这里,小伙伴们是不是有种恍然大悟的感觉呢?没错,我们也可以使用@PropertySources注解来指定properties配置文件。
通过注解注册一个配置文件
我们可以将此注解与@Configuration注解结合使用:
1 |
|
另一种注册新属性文件的非常有用的方法是使用占位符,它允许我们在运行时动态选择正确的文件:
1 |
|
定义多个属性位置
根据 Java 8 约定,@PropertySource注释是可重复的。因此,如果我们使用 Java 8 或更高版本,我们可以使用此注释来定义多个属性位置:
1 |
|
当然,我们也可以使用@PropertySources注解,指定一个@PropertySource数组。这适用于任何受支持的 Java 版本,而不仅仅是 Java 8 或更高版本:
1 |
|
在任何一种情况下,值得注意的是,在发生属性名称冲突的情况下,最后一个源读取优先。
使用/注入属性
使用@Value注释注入属性很简单:
1 |
|
我们还可以为属性指定一个默认值:
1 |
|
Spring 3.1 中添加的新PropertySourcesPlaceholderConfigurer解析了 bean 定义属性值和@Value注释中的${…} 占位符。
最后,我们可以 使用Environment API获取属性的值 :
1 |
|
Spring Boot 的属性
在我们进入更高级的属性配置选项之前,让我们花点时间看看 Spring Boot 中的新属性支持。
一般来说,与标准 Spring 相比,这种新支持涉及的配置更少,这当然是 Boot 的主要目标之一。
application.properties:默认属性文件
Boot 将其典型的约定应用于属性文件的配置方法。这意味着我们可以简单地将application.properties文件放在我们的src/main/resources 目录中,它将被自动检测。然后我们可以像往常一样从它注入任何加载的属性。
因此,通过使用此默认文件,我们不必显式注册PropertySource ,甚至不必提供属性文件的路径。
从2.4.0版本开始,Spring Boot 支持使用多文档属性文件,类似于YAML的设计:
1 | baeldung.customProperty=defaultValue |
请注意,对于属性文件,三个破折号符号前面有一个注释字符 ( # )。
特定于环境的属性文件
如果我们需要针对不同的环境,Boot 中有一个内置的机制。
我们可以简单地在src/main/resources目录下定义一个application-environment.properties文件,然后设置一个具有相同环境名称的 Spring 配置文件。
例如,如果我们定义一个“暂存”环境,这意味着我们必须定义一个暂存配置文件,然后是application-staging.properties。
此 env 文件将被加载并优先于默认属性文件。注意,默认文件还是会被加载,只是当发生属性冲突时,特定于环境的属性文件优先。替代方案:YAML 文件
Spring 还支持 YAML 文件。
所有相同的命名规则都适用于特定于测试、特定于环境和默认属性文件。唯一的区别是文件扩展名和对我们类路径上的SnakeYAML库的依赖。
YAML 特别适合分层属性存储;以下属性文件:
1 | database.url=jdbc:postgresql:/localhost:5432/instance |
与以下 YAML 文件同义:
1 | database: |
还值得一提的是,YAML 文件不支持*@PropertySource*注解,所以如果我们需要使用这个注解,它会限制我们使用属性文件。
另一个值得注意的地方是,在 2.4.0 版本中,Spring Boot 改变了从多文档 YAML 文件加载属性的方式。以前,它们的添加顺序基于配置文件激活顺序。然而,在新版本中,框架遵循我们之前为*.properties*文件指出的相同排序规则;在文件中声明较低的属性将简单地覆盖那些较高的属性。
此外,在此版本中,配置文件无法再从配置文件特定文档中激活,从而使结果更清晰、更可预测。